Temperature and Humidity sensor using Arduino display on I2C 16X2 LCD
Temperature and Humidity sensor using Arduino display on I2C 16X2 LCD
Library download link - https://bitbucket.org/fmalpartida/new-liquidcrystal/downloads
NOTE: Some of this type board come with the A0 A1 A2 connections (See photo) that are NOT bridged with solder as in the photo. Those will have address 0x27 not address 0x20. For that version you need to change the sketch example below.
LiquidCrystal_I2C lcd(0x20, 2, 1, 0, 4, 5, 6, 7, 3, POSITIVE);
MUST BE CHANGED TO:
LiquidCrystal_I2C lcd(0x27, 2, 1, 0, 4, 5, 6, 7, 3, POSITIVE);


Completed project

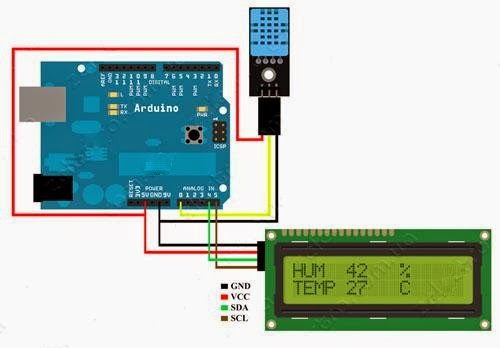
Schematics
A quick video
Code -
#include <dht.h>
#include <Wire.h>
#include <LCD.h>
#include <LiquidCrystal_I2C.h>
LiquidCrystal_I2C lcd(0x20, 2, 1, 0, 4, 5, 6, 7, 3, POSITIVE); // Addr, En, Rw, Rs, d4, d5, d6, d7, backlighpin, polarity
#define dht_dpin A0 //no ; here. Set equal to channel sensor is on
dht DHT;
void setup(){
Serial.begin(9600);
delay(300);//Let system settle
//Serial.println("Humidity and temperature\n\n");
delay(700);//Wait rest of 1000ms recommended delay before
//accessing sensor
lcd.begin(16,2);
lcd.backlight();
lcd.setCursor(0, 0);
lcd.print("Temp & Humidity");
}//end "setup()"
void loop(){
//This is the "heart" of the program.
DHT.read11(dht_dpin);
lcd.setCursor(0, 1);
lcd.print(DHT.temperature);
lcd.setCursor(5, 1);
lcd.print("C");
lcd.setCursor(8, 1);
lcd.print(DHT.humidity);
lcd.setCursor(13, 1);
lcd.print("%");
//Serial.print("Current humidity = ");
//Serial.print(DHT.humidity);
//Serial.print("% ");
//Serial.print("temperature = ");
//Serial.print(DHT.temperature);
//Serial.println("C ");
delay(2000);//Don't try to access too frequently... in theory
//should be once per two seconds, fastest,
//but seems to work after 0.8 second.
}// end loop()


Comments
Post a Comment